Amd ryzen 7 2700x loud fan noise issue fixed
Amd ryzen 7 2700x loud fan noise issue fixed. Taming the Beast: How to Fix Loud Fan Noise on Your Ryzen 7 2700X. Is the whirring of your Ryzen 7 2700X fan driving you crazy? You’re not alone. This powerful processor can get hot, leading to an aggressive fan curve that can be unbearable. But fear not, tech warriors! This guide will help you silence the beast and reclaim your peaceful computing experience.

Amd ryzen 7 2700x loud fan noise issue fixed
Finally after trying so many things this is how it was fixed.
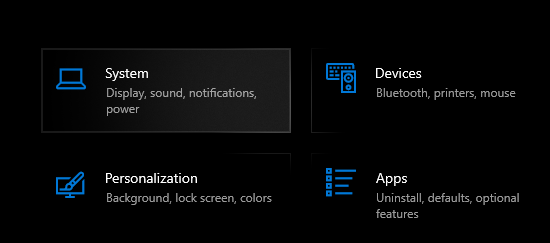
Step 1: Go to Windows>Settings

Step 2: Click on System
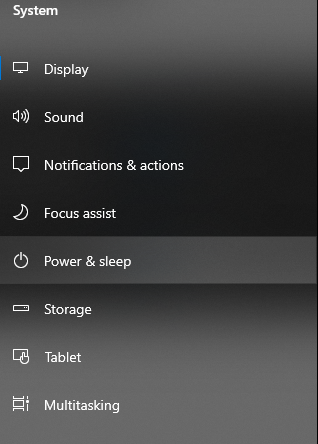
Step 3: Click on Power & sleep
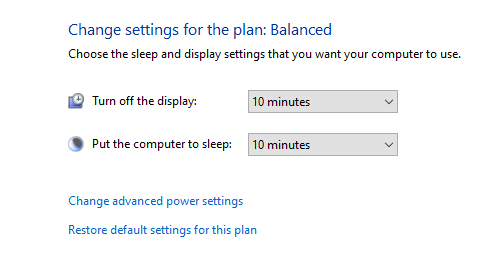
Step 4: Click on Additional power settings ( in some cases you may have to scroll down to find it)

Step 5: Click on Change plan settings ( it doesn’t matter what preferred plan you currently have

Step 6: Click on Change advance plan settings
Step 7: Click on Processor power management
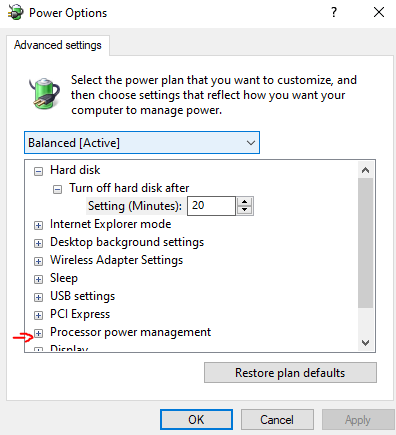
Step 8: Click on Maximum processor state then change the settings from 100% to 99%. Also click on Minimum processor state then change the settings from 100% to anywhere between 5% to 20%. Then Click Apply then Ok.
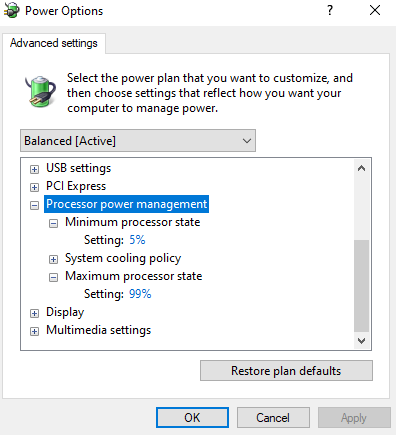
This should have solved the loud fan noise issue. If it did not, then continue reading bellow.
The Culprit: Unveiling the Reason Behind the Roar
The primary cause of loud fan noise in the Ryzen 7 2700X is its stock cooler, the Wraith Spire. While adequate for basic tasks, it struggles to keep up under high loads, causing the fan to spin at its maximum speed, generating an unpleasant racket.
Fan Control Frenzy – Taking Command of Your Fan Curve
Before investing in a new cooler, let’s explore software solutions. Many motherboards offer fan control software that allows you to adjust the fan curve. This lets you define how the fan speed changes in response to CPU temperature.
Dive into the BIOS and unleash your inner overclocker!
Steps:
- Launch BIOS Setup: Restart your computer and enter the BIOS setup menu. This typically involves pressing a specific key during boot, such as Del or F2.
- Locate Fan Control Settings: Navigate to the fan control section, which might be under “Hardware Monitor” or “Advanced.”
- Adjust the Fan Curve: Look for the CPU fan settings and adjust the fan curve to your liking. A steeper curve will result in faster fan speeds at lower temperatures, while a flatter curve will prioritize silence over performance.
- Save and Exit: Once satisfied, save your changes and exit the BIOS.
Pro Tip: Experiment with different fan curves until you find a balance between noise and performance that suits your needs.
Cleaning Crusade – Dusting Out the Problem
While software tweaks can help, sometimes a deeper cleaning is necessary. Dust buildup on the fan and heatsink can hinder airflow, forcing the fan to work harder and generate more noise.
Get your hands dirty and unleash the cleaning warrior within!
Steps:
- Gather your tools: Prepare a can of compressed air, a soft brush, and a lint-free cloth.
- Power down and unplug: Turn off your computer and disconnect it from the power outlet.
- Open the case: Carefully remove the side panels of your computer case to access the internal components.
- Blast away the dust: Use compressed air to blow dust off the fan blades, heatsink fins, and other areas around the CPU. Be careful not to spin the fan blades manually.
- Brush and wipe: Use the soft brush to remove any stubborn dust particles, and then wipe everything clean with the lint-free cloth.
- Reassemble and reboot: Put your computer back together and fire it up.
Pro Tip: Regularly clean your PC to prevent dust buildup and maintain optimal performance.
Thermal Paste Tango – Spreading the Coolness
Another potential culprit for fan noise is dried or improperly applied thermal paste. This essential paste helps transfer heat from the CPU to the heatsink, ensuring efficient cooling.
Master the art of thermal paste application and unlock cooler temperatures!
Steps:
- Gather your materials: You’ll need high-quality thermal paste, a clean razor blade or plastic card, and isopropyl alcohol.
- Prepare the surface: Clean the CPU and heatsink with isopropyl alcohol and wipe them dry with a lint-free cloth.
- Apply the paste: Apply a small pea-sized amount of thermal paste onto the center of the CPU.
- Spread the paste: Use the razor blade or plastic card to spread the paste evenly across the entire CPU surface, creating a thin and consistent layer.
- Mount the heatsink: Carefully place the heatsink back onto the CPU and secure it according to the manufacturer’s instructions.
Pro Tip: Watch instructional videos online for a visual guide on applying thermal paste correctly.
Upgrade Odyssey – Embracing the Power of Aftermarket Cooling
If software tweaks, cleaning, and thermal paste application haven’t yielded satisfactory results, it’s time to consider a more powerful cooling solution.
Unleash the ultimate cooling power with an aftermarket cooler!
Considerations:
- Type of cooler: Choose between air coolers or liquid coolers. Air coolers are more affordable but may not be as efficient for high-performance CPUs. Liquid coolers are quieter and more efficient but can be more expensive and require more installation space.
- Compatibility: Ensure the cooler you choose is compatible with your CPU socket and motherboard size.
- Performance and noise: Research the cooling performance and noise levels of different coolers to find the best balance for your needs.
Installation:
- Gather your tools: You’ll need a screwdriver, thermal paste (if not included with the cooler), and possibly zip ties or mounting clips.
- Prepare the CPU: Remove the existing cooler and clean the CPU surface with isopropyl alcohol.
- Mount the backplate: Depending on the cooler, you may need to install a backplate onto the motherboard.
- Attach the mounting brackets: Secure the mounting brackets for the cooler onto the motherboard.
- Apply thermal paste: If not pre-applied on the cooler, apply a pea-sized amount of thermal paste onto the CPU.
- Mount the cooler: Carefully place the cooler onto the CPU and secure it according to the manufacturer’s instructions.
- Connect the fan(s): Connect the fan(s) of the cooler to the designated header on your motherboard.
- Tidy up: Secure any cables and ensure proper airflow within the case.
- Power on and test: Turn on your computer and monitor the CPU temperature under load to verify the effectiveness of the new cooler.
Pro Tip: Consult online tutorials or installation guides specific to your chosen cooler for detailed instructions.
Beyond the Fan – Exploring BIOS Optimizations
Beyond fan control and cooling solutions, certain BIOS settings can also impact fan noise.
Delve into the depths of your BIOS and unlock hidden optimizations!
Options to explore:
- CPU Core Performance Boost: Disabling this feature can reduce CPU voltage and clock speed, leading to lower temperatures and potentially quieter fan operation.
- Precision Boost Overdrive (PBO): Tuning PBO settings can allow for more efficient power delivery to the CPU, potentially reducing fan noise.
- Cool ‘n’ Quiet: This feature automatically lowers CPU clock speed and voltage when under low load, resulting in quieter operation.
Pro Tip: Be mindful when adjusting BIOS settings as incorrect configurations can lead to instability or performance issues. Always research specific settings before making any changes.
Conclusion: Silence Achieved – The Roar of Your CPU is Now a Whisper
By implementing the strategies outlined in this guide, you can finally tame the noisy beast that is the Ryzen 7 2700X fan and restore peace to your computing experience. Remember, a silent PC is a happy PC!
You May Like: Dividend Investing for Retirement How to Secure Your Financial Future
Did these tips help you conquer the fan noise issue? If it did please share it.


